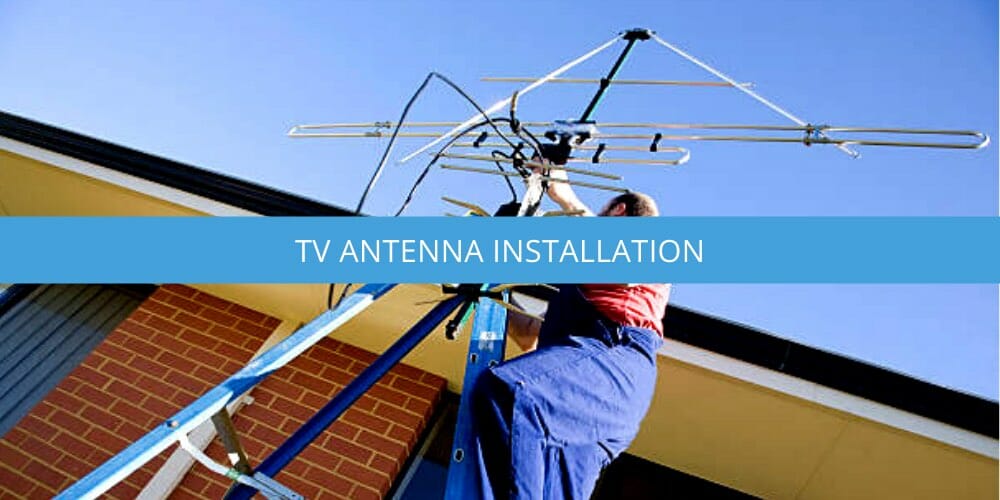
Do you need a complete guide on installing an HDTV antenna? Here you’ll find the know how to safely set up an antenna and get your favorite TV channels.
Many people don’t know that you can get free HDTV broadcasts with a good quality antenna and no monthly bill. You can also install your own with just a few supplies or hire someone to do it. Either way, you’ll be enjoying all of your favourite shows, movies and sporting events in near-HD quality for free!
This article is intended to help those who are thinking about installing their own TV antenna or for those of you who are considering installing a new antenna. Here I will describe the process and some possible choices for different scenarios.
Preparing for your TV antenna installation
Before you begin your TV antenna installation, it’s essential to do some research about the best spot for your antenna.
First, you will have to figure out which direction your local TV tower is located relative to your home. Users can do this by using the FCC’s (Federal Communications Commissions) website.
Once you’ve identified the direction of your local tower, you’ll want to prepare the location where your antenna will go.
Next, decide which type of installation you want: indoor or outdoor.
For an indoor installation, make sure there is a clear path from the window where you’ll be installing the antenna to the television that will be receiving its signal.
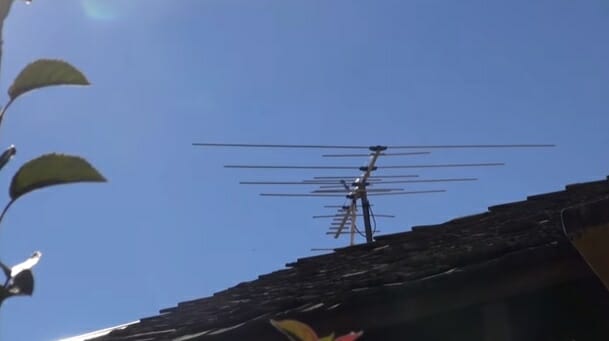
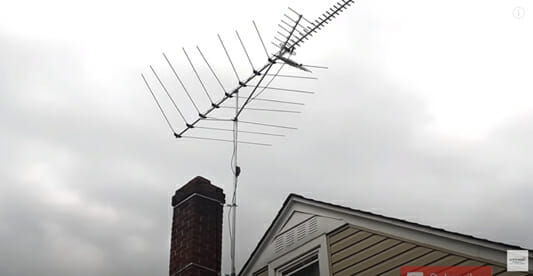
For an outdoor installation, make sure there are no obstructions between the location where you’ll install it and the direction in which your local TV tower is located. If possible, choose a spot on your roof as high up as possible—but not that high where you can’t reach it without a ladder!
How much will installing a TV antenna cost?
Fortunately, installing a TV antenna doesn’t have to cost much. There are three main costs involved with installing an antenna:
Tools
Depending on your handyman skills, you might already have everything you need for installation. If not, you can visit any hardware store or order online and get everything (a ladder and drill at least) for under $100.
The Antenna
The cost of the antenna itself will vary based on how many TVs you want the antenna to power and the features you’re looking for—like weatherproofing or a more extensive range. Depending on your needs, you can expect to pay anywhere from $25-$200.
Installation Services
Hiring a professional installer can be pricey if you think you are not comfortable doing it yourself. Fortunately, it isn’t necessary if you’re willing to do some work yourself! We’ll cover how to DIY-install your antenna later in this guide so that you don’t have to spend anything extra.
Is your TV digital ready?
If you have a TV manufactured before 2006, it is likely not digitally ready. If your TV is not digital-ready, it will not be able to receive a digital signal without being converted in some way.
If you have a TV manufactured after 2006, the chances are good that it is digital-ready. If you are unsure, check the owner’s manual that came with your TV or contact your TV manufacturer.
You may also be able to check if your TV is analogue or digital by turning on your TV and turning it to Channel 2. If all you see is “snow” or a “No Signal” message on the screen, your television is analogue. If you see a clear image or video then your TV is digital-ready.
A digital signal gives you better sound and picture quality than an analogue signal and allows you to access more channels than when using an analogue signal.
What do you need for TV antenna installation?
- Extension Ladder: You may need to reach high!
- Tool Pouch: Keep all your tools on you. No running back and forth.
- Antenna Mast: This is the main component of your antenna system. Install it, and you’ll be able to enjoy free TV for years to come!
- Base Mount: A great way to keep your antenna secure.
- Guy Wires (also called aircraft cable). You’ll use these to secure your antenna to the mounting structure.
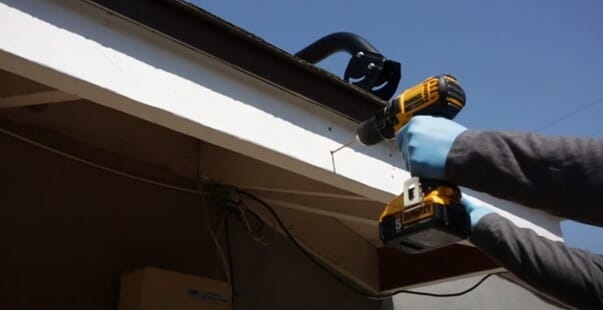
- Wall Bracket or Chimney Mount Straps: This is what you’ll use to attach your antenna to your house.
- U-bolts to secure the Antenna to the Mast: These are different from guy wires, which secure the mast, not the antenna itself.
- Sealants: This can be used as a weatherproofing agent for your antenna. You would have to apply this on every part of the antenna exposed to outdoor elements.
- Coaxial Cable: These are usually pre-made cables that are sold in stores. You can also get coaxial cable and connectors online if you’re looking to get them at a lower price. The coaxial cable is the one you would use to connect your TV to the antenna.
- Coaxial Compression Tool: This tool is used to crimp the connectors onto coaxial cables, which allows them to work properly when connected with other devices like TVs and antennas.
- Compass for aiming your Antenna: This is necessary because it helps to aim the antenna in the right direction and find which channels are available in that area based on where it points towards (compared against other antennas). To use this tool, simply point one end at your home or business location while holding down both buttons on either side until an audible signal sounds off; then rotate around until you hear another signal. (1)
TV Antenna Installation Steps
In carrying out your TV antenna installation, here are the steps you should consider.
Step 1: Locate the Antenna Broadcast Towers Near You
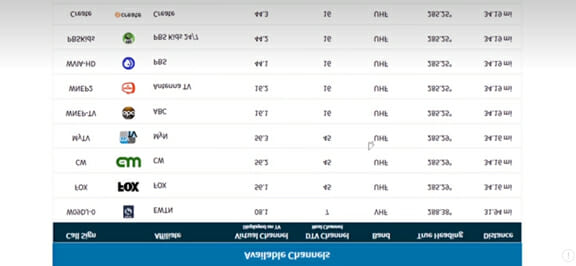
The thing you should do first when installing an antenna is to locate the broadcast towers near you. Why? Because that’s where your signal will be coming from. If your home is far away from the nearest towers, you’ll have trouble receiving a good signal. How far away can you be and still get a good signal? It depends on how tall and powerful the towers are and what kind of obstructions there are in between them and you.
So it’s crucial to figure out where the nearest broadcast towers are because that will help you decide which antenna is suitable for you. But don’t worry—I’ve got a tool that makes this easy! Just head over to this Federal Communications Commission FCC TOOL and enter your address. The tool will tell you which channels are available in your area and the distance of those channels from your address. This will also help you determine if you need an indoor or outdoor antenna and which type of antenna it should be.
It is essential to discuss the subject of VHF and UHF antennas now, so you can decide which you need for your new system.
VHF vs UHF Channels
VHF means Very High Frequency, while UHF means Ultra High Frequency. VHF channels are typically 2-13, while UHF channels are typically 14-51, with some going up to 69. It’s good to check ahead of time to see if you have any stations available in your area that use these frequency ranges to plan accordingly when purchasing your antenna.
The majority of the broadcast towers in the U.S. are now transmitting on UHF channels, but some still use VHF frequencies. VHF signals travel shorter distances than UHF signals, so if your antenna isn’t high enough above ground, it won’t pick up VHF channels far from you. So that’s why experts always recommend using an outdoor antenna because they’re more powerful and can pick up these signals much better than an indoor antenna can.
What are FCC Channel Repacks?
The FCC Channel Repacks are an initiative launched after the Federal Communications Commission (FCC) decided in 2017 to free up the spectrum from television broadcasters so that it could be used by wireless companies instead. The FCC has auctioned off the spectrum, and in order for wireless companies to use this new spectrum, they need their own channels to move into.
Step 2: Purchase your TV Antenna
Purchasing a TV antenna is the next step in setting up your over-the-air (OTA) TV service. Here are some essential things to consider when making your purchase.
Directional vs Omnidirectional?
Directional antennas point toward specific stations, whereas omnidirectional antennas receive signals from all sides. If you know where the towers for your local stations are located, a directional antenna is usually a better choice.
More on Antenna Range?
The range of an antenna is determined by the amplification factor and the strength of the signal it receives. Amplification makes marginal signals viewable by boosting them, but obstacles will still block weak signals. The range of an antenna can be increased by placing it high off the ground or on top of a mast or tower.
What colour is your antenna?
When purchasing an antenna, look for the CTA colour code. The CTA, as a consumer-rights organization, has created a colour code that corresponds to the quality of broadcast signals.
Outdoor antennas have their own set of colour codes (defined by CTA) are as follows:
Green: These antennas have been designed to pick up only UHF signals.
Yellow: You guessed it! These antennas are designed to focus on VHF signals.
Red: If you see a red code, it means that the antenna can pick up both VHF and UHF signals.
Black: This colour is reserved for antennas capable of picking up both VHF and UHF frequencies and FM radio signals.
Blue: Short-range, small area coverage
Gray: Outdoor Antennas that are rated for UHF, VHF and FM (receives TV stations) and are capable of receiving all broadcast signals from 180 to 700 MHz.
White: Outdoor Antennas that are rated for UHF only (receives TV stations) and can receive broadcast signals from 470-700 MHz.
Orange: VHF/UHF – Best for TV signals at a medium distance.
Antenna Rotator vs Network Tuner?
If you’re looking for an antenna that lets you watch TV from any direction, the antenna rotator is not for you. An antenna rotator requires you to manually turn the antenna to the direction of your choice, which can get tedious and annoying if you want to regularly switch between channels. On the other hand, the network tuner operates automatically and lets you switch between channels with ease. The network tuner won’t solve all your problems, though—it doesn’t provide access to every channel in every part of the country, so don’t set your expectations too high!
Antenna Rotator Drawbacks
Antenna rotators allow you to move your antenna and change the channels you receive, but they’re notoriously unreliable. The best models are prone to breakage, and the cheaper models are particularly vulnerable to failure. If you need a reliable antenna for home use, it’s not worth the money. Also, suppose you’re planning on using your antenna with your RV or boat so that you can receive local TV wherever you travel. In that case, an antenna rotator is a bad investment because it will be susceptible to damage from high winds and rough waters. (2)
Enter the Network Tuner?
If you want a fully rotating TV antenna, I recommend investing in a network tuner instead. It doesn’t require a separate device—you can just plug it into your WiFi router and control it through your phone or computer—and it’s totally impervious to weather damage!
Step 3: Choose a good location for your antenna
Choosing the right location is critical. You want to make sure that your antenna can get a good signal, and you don’t want it to be too close to anything that might block or interfere with that signal.
Where to install your TV antenna?
First, check the distance from your home to the nearest broadcast tower. It is recommended that you install antennas where they will have a clear line of sight with the tower and will be mounted as high as possible. Your antenna should also be installed in an area where there are no trees or other large objects in the way—the more obstructions there are between your antenna and the tower, the worse your reception will be.
For example, your house is an area where there are many trees or right next to a tall building that could block some of the signal (or if you live in a valley), try mounting your antenna on top of your roof instead of outside on a pole. This way, it will be easier to receive signals from all directions without interference from any nearby obstacles.
Next up: Don’t forget about those pesky power lines! While power lines won’t necessarily interfere with TV signals, they can cause some issues with WiFi routers and other wireless devices in your home.
How high should you mount your TV antenna?
How high you should mount your TV antenna depends on a few factors. The higher you mount it, the better reception you’ll get since the antenna will be less likely to be blocked by buildings or trees. However, if your house is one story and you don’t have any large trees nearby, mounting it on a wall instead of the roof might be easier.
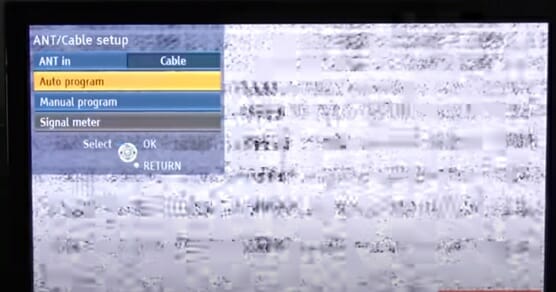
If you’re having a hard time deciding, try this little trick: hold up your antenna in the spot where you think you want to mount it and use the compass on your phone to find out which way is north. Then turn the antenna so that it’s pointing in that direction. Now turn the antenna and watch how the signal strength changes as you turn it back and forth. If there’s one direction that gives you great reception, pick a spot above or near where you’re standing. If there’s not really one direction that gives you better reception than others, mount it as high as possible (ideally on your roof) and point it toward whichever direction gives you the most reliable signal.
Spy on your neighbours!!!
Here I mean, look for antennas on your neighbours’ rooftops and try to figure out how high up they are. The higher up they are, the better the signal is going to be. You should also ask them if they have any complaints about their antenna. If they do, it’s probably not a good location for yours.
Step 4: Get your tools ready
Getting your tools and parts together is one of the most essential steps to installing your TV antenna. Before you get started, you’ll want to review the installation manual that comes with your antenna and mounting assemblies. This will ensure that you are not missing any components.
You’ll also want to do this before getting up on your roof or crawling into your attic. There’s nothing worse than realizing you’re missing a nut or bolt when it’s too late! If your antenna manufacturer has an installation video on YouTube, check it out to preview what you’ll need for the project.
Step 5: Time to mount your antenna
Now that your antenna is assembled, it’s time to mount it. You have three options: wall mount, chimney mount, or rooftop mount. You can also choose to simply sit your antenna on a flat surface. However, I do not recommend this option as it will likely not pick up the best signal.
When mounting an antenna outdoors, please keep in mind that weather conditions may cause damage to your antenna. So I recommend purchasing a waterproof cover for extra security in all weather conditions.
Wall Mount Installation
Starting with wall mounts, make sure you place your antenna on a vertical surface. If you don’t have access to a vertical surface, consider mounting it on the ceiling. Keep in mind that your antenna will need to be pointed in the direction of the signal towers. You may have to move it around to find a good spot and get a clear signal.
Chimney Mount Installation
If you are using a chimney mount, you don’t have to worry about pointing it in the right direction because chimneys usually point directly at signal towers, making them ideal locations to receive signals. Simply attach your antenna to the chimney mount and connect the coax cable (the same one you used earlier) from your antenna to the back of your TV set or converter box.
Rooftop Installation
Finally, if you choose a rooftop installation, make sure that you secure your antenna as much as possible. This is key for ensuring that both your signal quality and your safety are at their best.
Step 6: Running the coaxial cable
Once you’ve determined where the antenna will go and have prepared the cable by stripping off the outer casing and crimping it, you’re ready to run the coaxial cable in your home.
Waterproof the coaxial cable connections
First, waterproof any connections you’ve made with a silicone lubricant or rubber sealant. You can find these at a hardware store. This is an essential step because it ensures that water does not enter the connection point and cause corrosion over time.
Running the coaxial cable in the house
Next, run the coaxial cable through your home. Keep in mind that it should be kept away from electrical wiring, as this can interfere with your signal reception. It might require you to drill holes through walls and sills to achieve this.
Test your coaxial cable
It’s time to run your coaxial cable. But before you start, you’ll want to make sure it works.
To do this, grab your TV and coaxial cable. Connect the one end of the cable to the antenna and the other end to your TV. Turn on your TV and tune it to channel 1. If you see a picture, everything is working fine, and you’re ready to move on! If not, grab your multimeter and check all the connections for continuity.
Now that you know your coaxial cable is working properly, you’re ready to connect it from your antenna to the wall jack.
Connect the coaxial cable to the antenna
Once you’ve tested your coaxial cable, it’s time to connect it from the antenna to the wall jack. You’ll want to make sure that you leave yourself enough slack so that you can move or remove either piece without having to unplug any cables.
Step 7: Grounding your TV antenna installation
Grounding your TV antenna installation is an essential part of the process. It will help prevent lightning strikes and other power surges from affecting your new antenna, potentially shortening its lifespan or even causing it to stop working altogether.
A proper grounding kit will include a grounding block and a grounding wire at least 6 feet long. It should be thick bare copper wire at least 12 AWG (American Wire Gauge). It can be purchased from most electronics stores.
To ground your TV antenna installation, simply attach one end of the wire to the grounding block and the other end to a ground rod. A ground rod is a metal rod that has been driven into the ground, usually in an area near the electrical service entrance for your home. If you can’t find the ground rod, you can drive one in yourself with a hammer drill and a 4-foot-long copper-clad steel ground rod.
Your roof work of TV antenna installation should be complete at this point! Once you have finished this step, you’ll have a fully functional antenna that will allow you to enjoy high-definition programming for free on any television in your house!
Step 8: Connecting your antenna to your TV
It’s time to connect your antenna to your TV. For the first time, you’ll be able to see if all of your hard work has paid off.
First, locate the coaxial cable that runs from your antenna and into your home. This should have been run through an open window or down a wall on the exterior of your home. It may also be underground, so make sure to check before you start digging! Once you’ve located it, follow the cable from the antenna down to the entry point in your home (this is usually near a window).
Now that you’ve located the cable, follow it into your house and look for where it’s connected to one of your TVs. If it’s not connected yet, go ahead and do that now. Don’t worry: there’s no way to screw this up. Just connect one end of the coaxial cable to the “ANT” port on the back of your TV, and voila—you’re done!
If everything goes according to plan (hopefully), you should now see a couple of dozen channels on your TV when you turn it on. If there aren’t any channels available at all or fewer than you expected, try moving around the associated cables until something changes.
Wrapping Up
Installation of a TV antenna can be simple if you follow the steps carefully. If you have gone through all the above information, you will know what equipment to buy, where to put it and how to hook it up. It really isn’t that complicated. Once you find the best spot for optimal viewing, installation is a breeze, and there is little or no drilling required. Antenna installation should not cost more than $200-250, including parts and (if) labour. In addition, the more channels in your local area, the better the reception will be; however, don’t take this as gospel. The location is as important as the number of channels.
Hopefully, with some help from this article, you will find yourself watching your favourite programs with the same satisfaction as live audiences did back in the day.
You may check and bookmark other learning and product guides we’ve listed below. Until our next article!
- Best Digital Converter Boxes
- Best Coaxial Cable for HDTV
- How many TVs can you hook up to an outdoor antenna
References
(1) business location – https://www.thebalancesmb.com/choosing-a-location-for-your-business-1201032
(2) bad investment – https://www.investopedia.com/articles/pf/08/bad-investment-advice.asp
Video References
Video 1: Channel Master
Video 2: Homemade Chow
Video 3: GVTV 12
Video 4: Antenna Man
